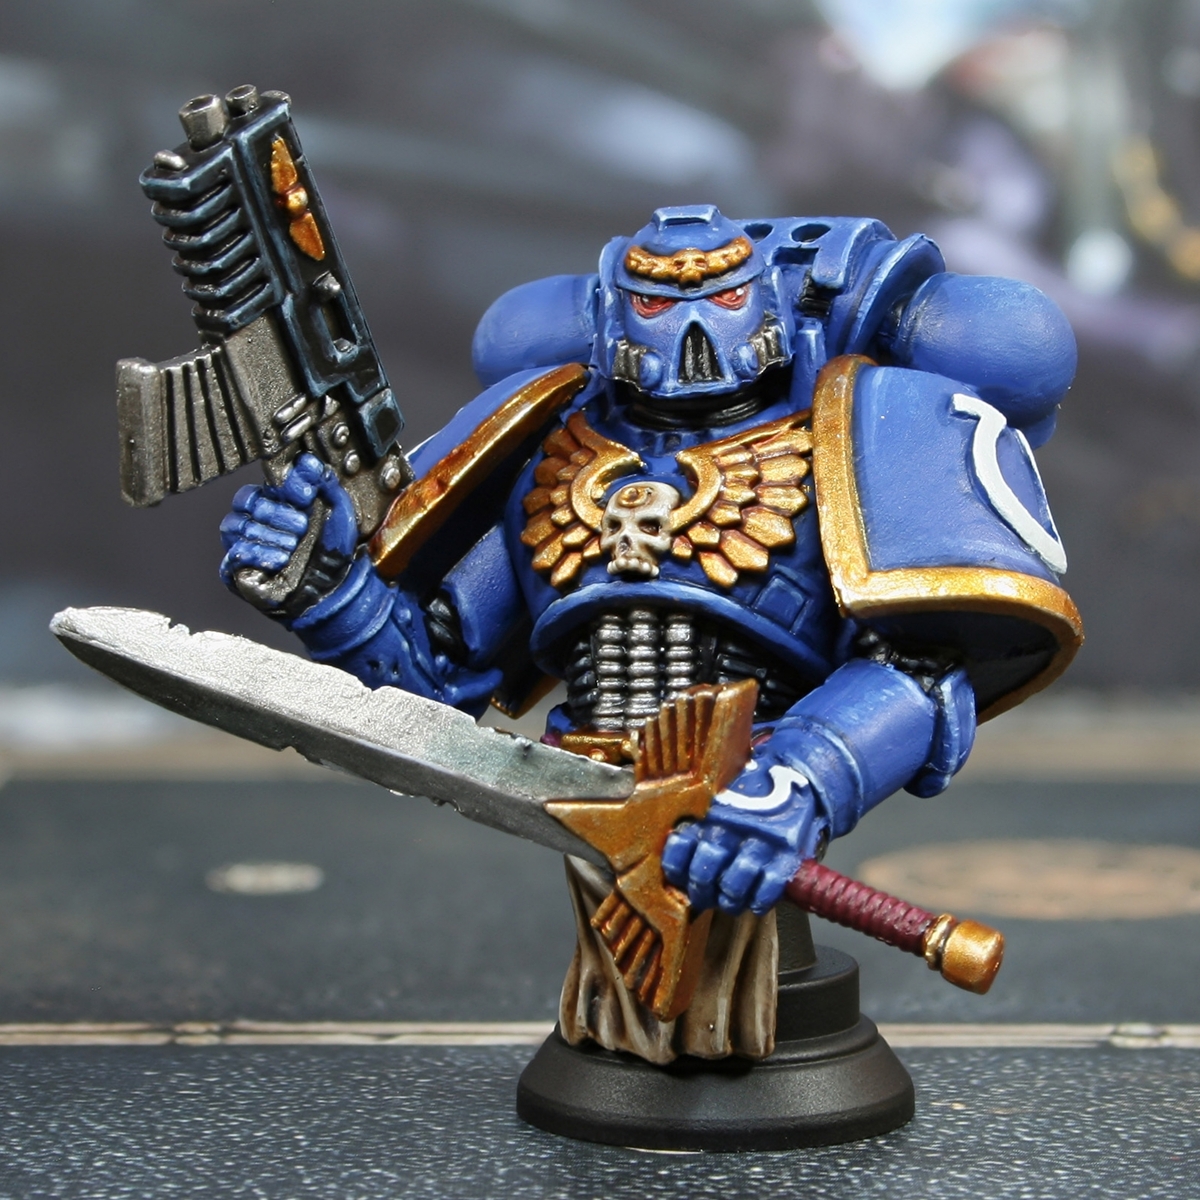
Relic: Ultramarines Captain Playing Peice
Here are the steps I took when painting this playing piece from 'Wizkids' version of the board game "Relic". If you like the look of this bust, it is available with the specific edition available here: https://amzn.to/3paDgCQ Please be aware that the 'Fantasy Flight' version has different resin busts/playing pieces.
Blue Power Armour
- Basecoat with Macragge Blue .
- Soft shade the recesses, with Kantor Blue .
- Mix your Kantor Blue 1:1 with Abaddon Black and enhance the shading with fine lines.
- Add chunky highlights of 1:1 Macragge Blue and Calgar Blue .
- Add fine edge highlights of Calgar Blue .
- Selectively edge highlight with Fenrisian Grey .
- Finish off with specular highlights of Blue Horror where needed.
Gold Trim
- Basecoat with Retributor Armour .
- Shade recesses with Reikland Fleshshade .
- Shade deep recesses with a thin 1:1 mix of Doombull Brown and Abaddon Black .
- Re-establish Retributor Armour where needed.
- Highlight with a 1:1 mix of Retributor Armour and Stormhost Silver .
- Selectively edge highlight with Stormhost Silver (or the superior Vallejo Model Air Silver RLM01 Metallic ).
Black Undersuit
- Basecoat with Abaddon Black .
- Chunky edge highlists with Mechanicus Standard Grey and Abaddon Black , mixed 1:1.
- Finer highlights with Dawnstone .
- Selective highlights with Administratum Grey .
- Specular highlights with 1:1 Administratum Grey and White Scar where needed.
Red Lenses
- Basecoat with Khorne Red and Abaddon Black mixed 2:1. Mephiston Red.
- Layer Mephiston Red over the basecoat coverring everything but the recesses.
- Paint the majority of the lens with Wild Rider Red , pulling your brush towards the nose.
- Paint a smaller highlight of Fire Dragon Bright .
- Place a specular highlight of Fire Dragon Bright and White Scar , right next to the nose.
- Finish with a dot of White Scar in the corner furthest from the nose.
Cream Tabbard Cloth
- Basecoat the cloth with Karak Stone .
- Wash with Agrax Earthshade .
- Mix Karak Stone 1:1 with Screaming Skull and paint chunky highlights.
- Add White Scar to the above mix and add smaller highlights on more extreme points.
Working Metals
- Basecoat the metals with Leadbelcher .
- Wash with Nuln Oil .
- Glaze/highlight with Ironbreaker .
- Add edge highlights with Stormhost Silver (or a light silver of your choice).
Black Bolter Casing
- Basecoat with Abaddon Black .
- Edge highlight everything with a thick line of Dark Reaper .
- Highlight everything again, this time with a thin line of Thunderhawk Blue . This colour is a good place to put in some scratches too.
- With Fenrisian Grey , selectively highlight upward facing edges, corners and prominent edges. Stick primarily to edges where the light would hit and always drag your brush towards the brightest point. If you added scratches previously, reinforce them with a smaller, thinner line underneath.
- Finally, edge add small highlights to the centre of the previous highlights and corners with Blue Horror . Try to make them very small, dots if at all possible.
Decorative Skulls
- Basecoat with a 1:1 mix of Karak Stone and Ushabti Bone .
- Shade recesses with a mix of Reikland Fleshshade and Agrax Earthshade .
- In very deep recesses, add extra darknes with a thin mix of Steel Legion Drab and Rhinox Hide .
- Drag some fairly thin Screaming Skull towards edges, to begin highlighting them.
- Enhance these with edge highlgihts of Screaming Skull mixed 1:1 with White Scar .
- Finish off the skulls with specular highlights of White Scar (or another pure white).

Rookie Brushes
RookieBrushes
Aspiring miniature painter and biscuit enthusiast. Here to share my hobby and help where I can.
Citadel Painting System 29
Base 10
- Abaddon Black
- Kantor Blue
- Khorne Red
- Leadbelcher
- Macragge Blue
- Mechanicus Standard Grey
- Mephiston Red
- Retributor Armour
- Rhinox Hide
- Steel Legion Drab
Shade 3
- Agrax Earthshade
- Nuln Oil
- Reikland Fleshshade
Layer 16
- Administratum Grey
- Blue Horror
- Calgar Blue
- Dark Reaper
- Dawnstone
- Doombull Brown
- Fenrisian Grey
- Fire Dragon Bright
- Ironbreaker
- Karak Stone
- Screaming Skull
- Stormhost Silver
- Thunderhawk Blue
- Ushabti Bone
- White Scar
- Wild Rider Red
Vallejo Model Air
Base 1
- 71.063 Silver RLM01 Metallic
