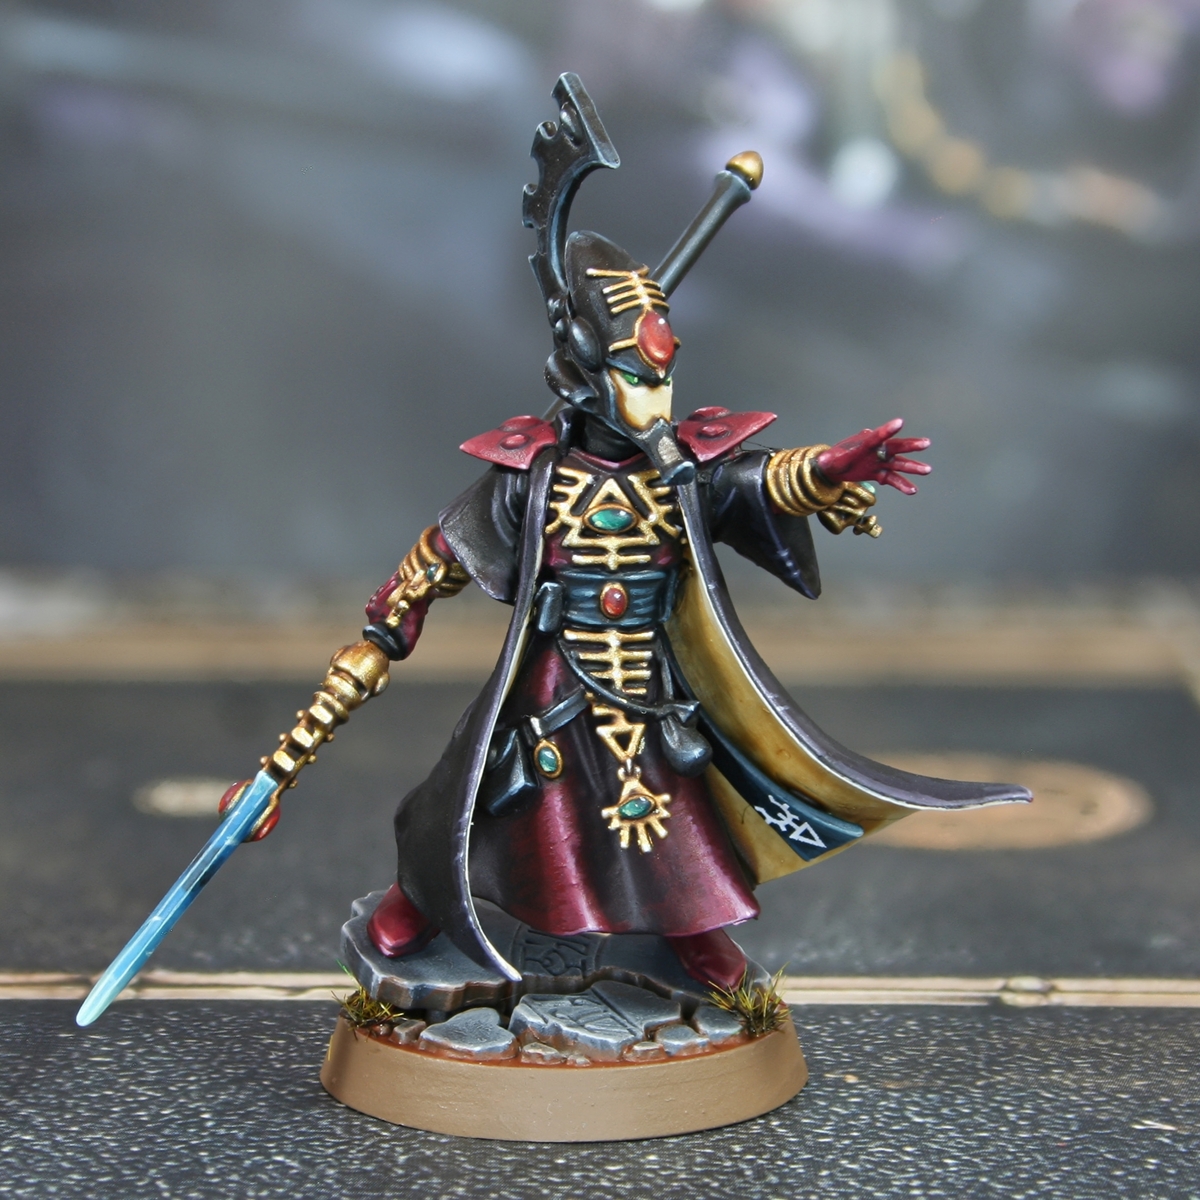

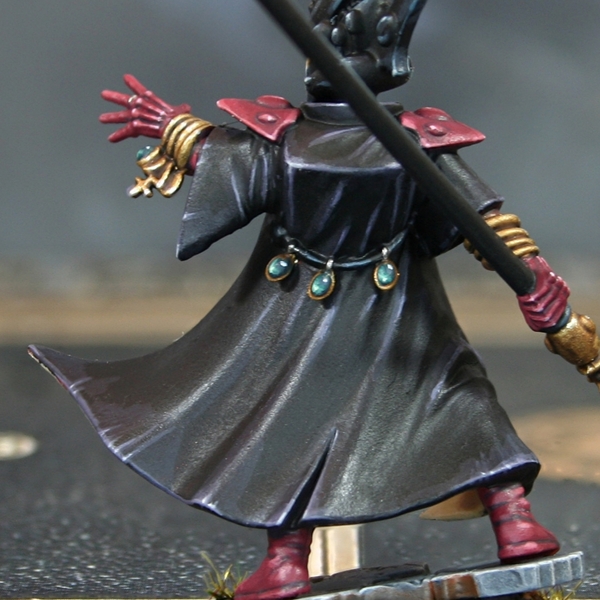
 Magenta Armour
- Basecoat with 1:1 Khorne Red and Screamer Pink .
- Recess shade with 1:2 Khorne Red and Incubi Darkness .
- Apply chunky highlights of 2:1 Wazdakka Red and Screamer Pink .
- Now go over all of hte previous stage with finer highlights of 1:1 Wazdakka Red and Morghast Bone .
- Selectively highlight curves and corners with 1:1 Wazdakka Red and Screaming Skull .
- Mix some White into the previous paint and pick out points where light would hit.
 Bone Faceplate
- Basecoat with Ushabti Bone .
- Shade the recesses with Skeleton Horde .
- If you need to darken any areas, run a line of Agrax Earthshade into the deepest parts.
- Add chunky highlights of Screaming Skull .
- Now add fine highlights of Pallid Wych Flesh .
- Finish with selective highlights of White where needed.
You are probably best in painting the lining of the coat at the same time, with the same paints and rough method. The other real difference being the shading needing to be a little more extreme with it being obsurred. Consider glazing or just full on washing it with your Skeleton Horde mix or just Seraphim Sepia .
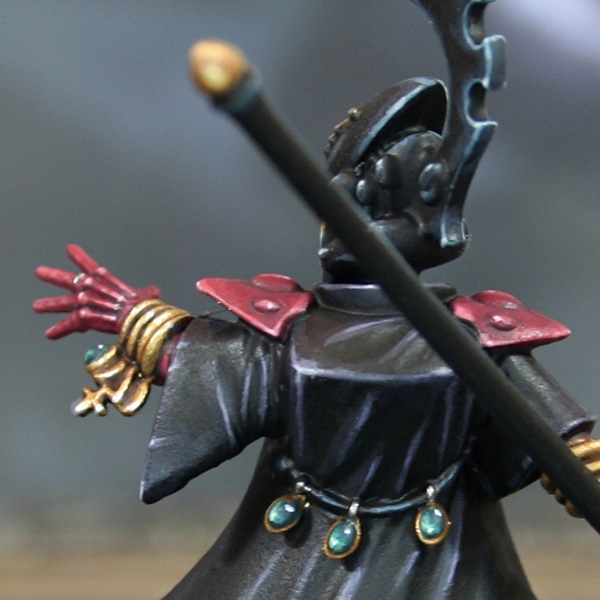
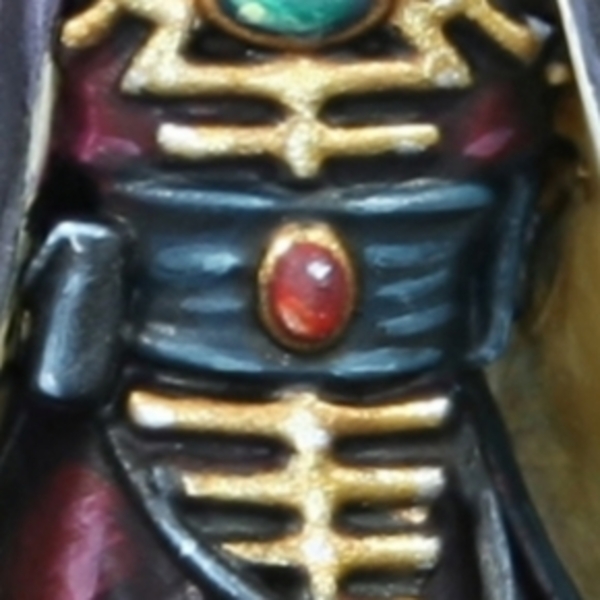
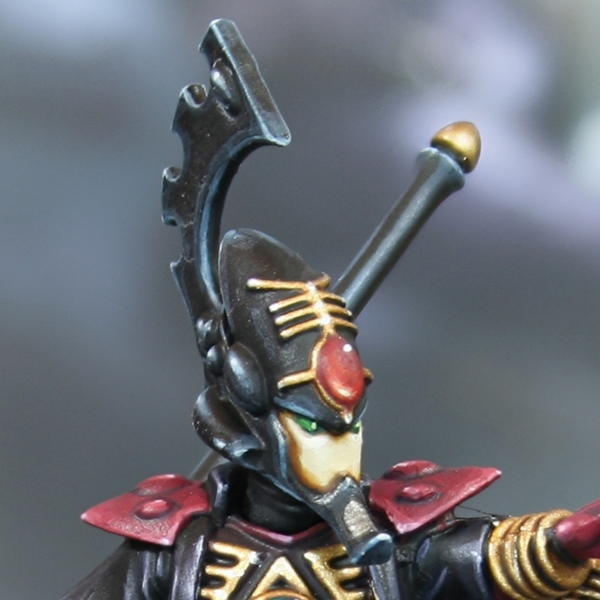 Black Armour
- Basecoat with Abaddon Black or another Black of your choice.
- Edge highlight everything with a thick line of Dark Reaper .
- Highlight everything again, this time with a thin line of 1:1 Dark Reaper and Grey Seer . This colour is a good place to put in some scratches too.
- Increase the amount of grey in the mix to about 1:2 Dark Reaper and Grey Seer . Selectively highlight upward facing edges, corners and prominent edges. Stick primarily to edges where the light would hit and always drag your brush towards the brightest point. If you added scratches previously, reinforce them with a smaller, thinner line underneath.
- Finally, edge add small highlights to the centre of the previous highlights and corners with Grey Seer . Try to make them very small, dots if at all possible.
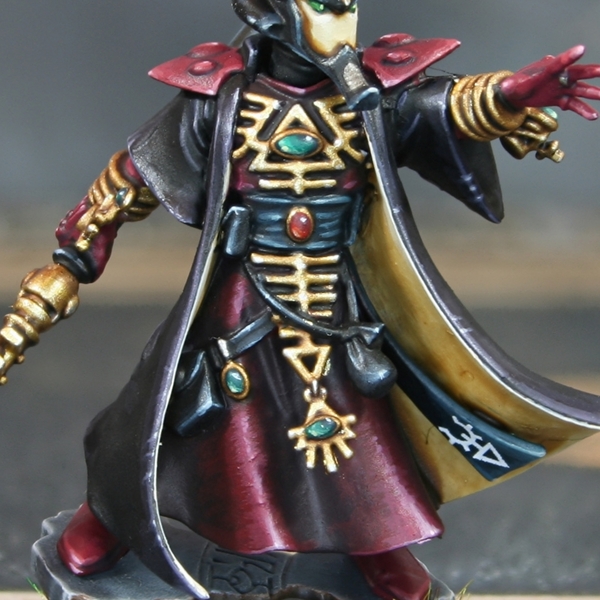 Burgundy Robe
- Basecoat with Abaddon Black & Barak-Nar Burgundy , mixed 1:1.
- Glaze and highlight with Barak-Nar Burgundy & Khorne Red mixed 1:1.
- Repeat the above steps with Khorne Red , coverring a smaller area.
- Now do it again, with 2:1 Khorne Red and Grey Seer .
To finish up, just increase the amount of Grey Seer in the above mix, coverring a smaller and smaller area. Just go by eye, until you are happy with how it looks. Feel free to go back to a previous colour and glaze over aeverything to redden it, if needed,. then work your way up again.
 Black Overcoat
- Basecoat with Black or Abaddon Black .
- Glaze and chunky highlight with Abaddon Black , Kantor Blue , Barak-Nar Burgundy , Dark Reaper , mixed in roughly equal amounts.
- Apply finer highlights and a few scratchy texture lines with 2 parts Dark Reaper 1 part Barak-Nar Burgundy and 1 part Grey Seer .
- Now increase the amount of Grey Seer in the above mix and more selectively highlight the last stage again. I would advise enchancing your lines from the previous steps with thinner lines of this colour too.
- Finish with very small/specular highlights of Grey Seer .
 Teal Sash
- Basecoat with Incubi Darkness .
- Use some thinned Incubi Darkness & Abaddon Black , mixed 1:1, to shade folds and recesses.
- With Incubi Darkness & Screaming Skull mixed 2:1, highlight the sash.
- Apply fine highlights of Incubi Darkness & Screaming Skull mixed 1:1.
- Selectively highlight with Incubi Darkness & Screaming Skull mixed 1:2.
- Finish off with small specular highlights of Screaming Skull on corners.
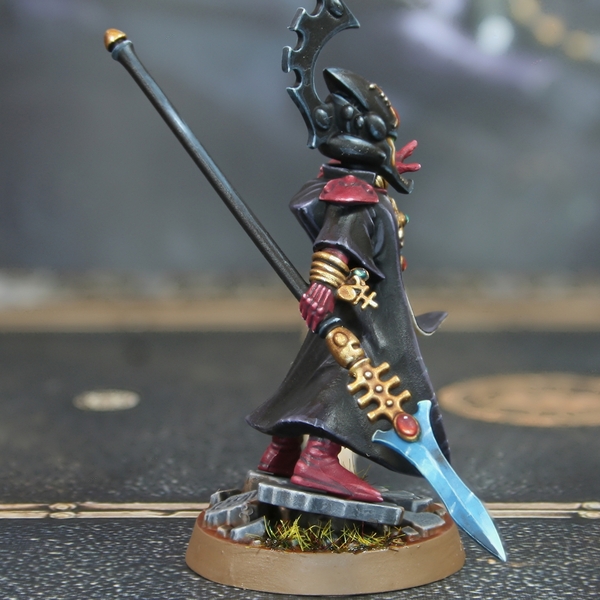 Black Weapon
- Basecoat with Abaddon Black or another Black of your choice.
- Edge highlight everything with a thick line of Dark Reaper .
- Highlight everything again, this time with a thin line of Thunderhawk Blue . This colour is a good place to put in some scratches too.
- With Fenrisian Grey , selectively highlight upward facing edges, corners and prominent edges. Stick primarily to edges where the light would hit and always drag your brush towards the brightest point. If you added scratches previously, reinforce them with a smaller, thinner line underneath.
- Finally, edge add small highlights to the centre of the previous highlights and corners with Blue Horror . Try to make them very small, dots if at all possible.
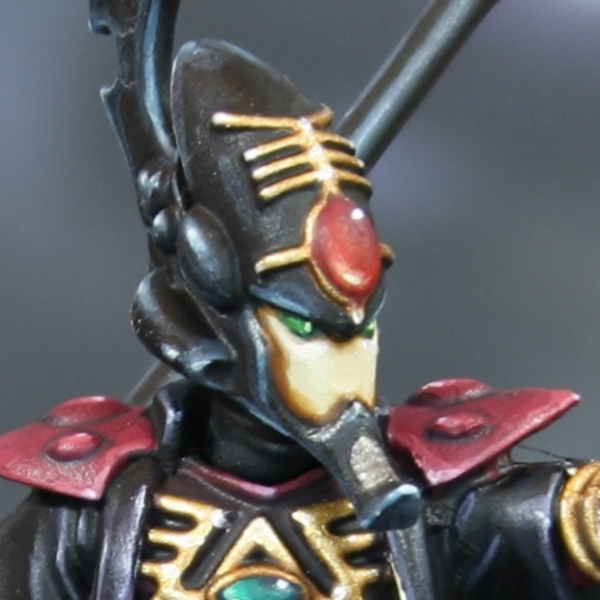 Green Eye Lenses
- Basecoat with Caliban Green .
- Highlight the centre part of the eye with Warpstone Glow , pulling the brush towards the nose.
- Highlights a smaller area, closer to the nose, using Moot Green .
- Mix some Ice Yellow into your Moot Green and add a specular highlight right next to the nose.
 Jade Spirit Stone
- Basecoat with Incubi Darkness .
- Paint the lower lefthand side with Kabalite Green . I'd recommend coverring about two thirds of the total surface.
- Now repeat, coverring a smaller area with Sybarite Green .
- Mix a little Ice Yellow into the Sybarite Green and add a very small highlight. Place this in the very bottom-left.
- Finish off the gem with a specular highlight of :white on the top-right.
 Red Spirit Stones
- Basecoat with Khorne Red .Evil Sunz Scarlet
- Shade the top righ portion and around the base with Gal Vorbak Red . I tend to do this step on the larger gems only.
- Paint the lower lefthand side with Evil Sunz Scarlet . I'd recommend coverring about two thirds of the total surface.
- Now repeat, coverring a smaller area with Troll Slayer Orange .
- Either use Lugganath Orange or mix a little Ice Yellow into the Troll Slayer Orange and add a very small highlight. Place this in the very bottom-left.
- Finish with a specular highlight of pure Ice Yellow , if you have the space. This step is probably skippable, but I just did it because of the size of the spirit stones I painted red.
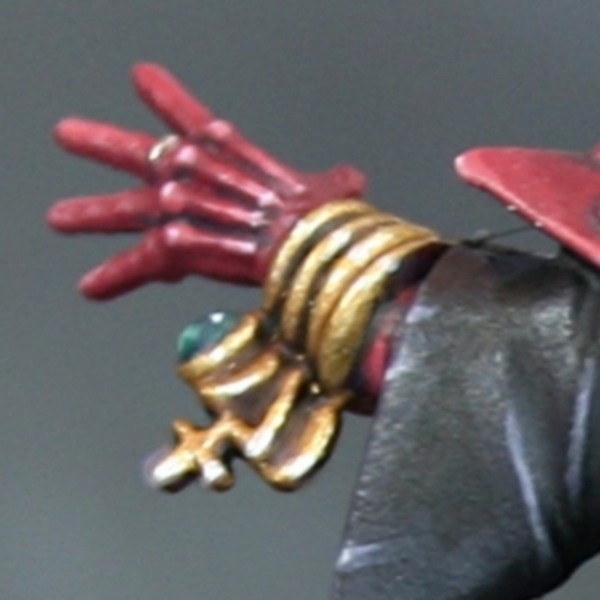 Gold Details
- Basecoat with 3:1 Retributor Armour and Silver RLM01 Metallic .
- Wash with Wyldwood , thinned with four times as much Contrast Medium .
- Where the metal looks a little borign, consider glazes of Gore-grunta Fur , to add warmth.
- Mix a little more Silver RLM01 Metallic into your base mix, and apply selective highlights.
- Finish with very small highlights of Silver RLM01 Metallic .
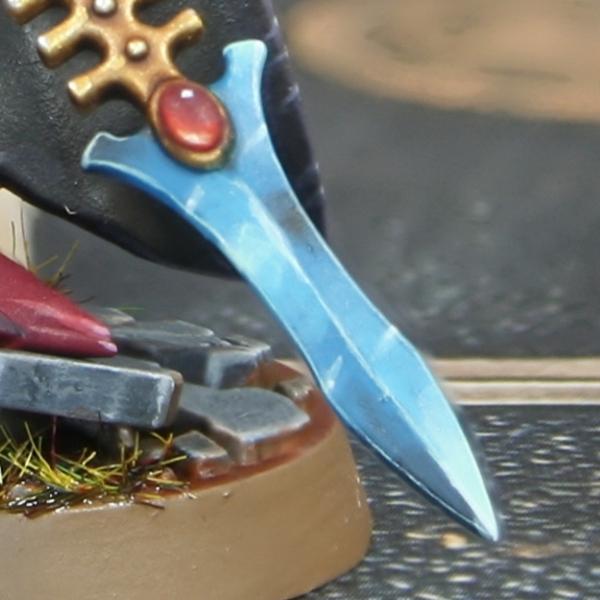 Singing Spear Blade
- Basecoat with Thousand Sons Blue .
- Paint/glaze half of each side of the blade with Temple Guard Blue .
- Glaze Gauss Blaster Green toward the tip, furthest from the Thousand Sons Blue .
- Glaze Incubi Darkness on the opposing side, running in the opposite direction.
- Enhance this shadow by glazing Abaddon Black towards the tip.
- Edge highlight carefully with Gauss Blaster Green . I like to add a few scratches to the blade here too.
- Selectively edge highlight tips and corners with a pure white. If you added scratches to the blade in the last step, add smaller lines or specular highlights to them.
If at any point you are unhappy with how the glazing is going, try switching back to the previous colour and glaze in the opposite direction. You can switch back and forth like this at any point, until you are satisfied.

Rookie Brushes
RookieBrushes
Aspiring miniature painter and biscuit enthusiast. Here to share my hobby and help where I can.
Citadel Painting System 35
Base 12
- Abaddon Black
- Barak-Nar Burgundy
- Caliban Green
- Gal Vorbak Red
- Grey Seer
- Incubi Darkness
- Kantor Blue
- Khorne Red
- Morghast Bone
- Retributor Armour
- Screamer Pink
- Thousand Sons Blue
Shade 2
- Agrax Earthshade
- Seraphim Sepia
Layer 17
- Blue Horror
- Dark Reaper
- Evil Sunz Scarlet
- Fenrisian Grey
- Gauss Blaster Green
- Kabalite Green
- Lugganath Orange
- Moot Green
- Pallid Wych Flesh
- Screaming Skull
- Sybarite Green
- Temple Guard Blue
- Thunderhawk Blue
- Troll Slayer Orange
- Ushabti Bone
- Warpstone Glow
- Wazdakka Red
Technical 1
- Contrast Medium
Contrast 3
- Gore-grunta Fur
- Skeleton Horde
- Wyldwood
Vallejo Model Air
Base 1
- 71.063 Silver RLM01 Metallic
Vallejo Model Color
Base 3
- 70.858 Ice Yellow
- 70.950 Black
- 70.951 White