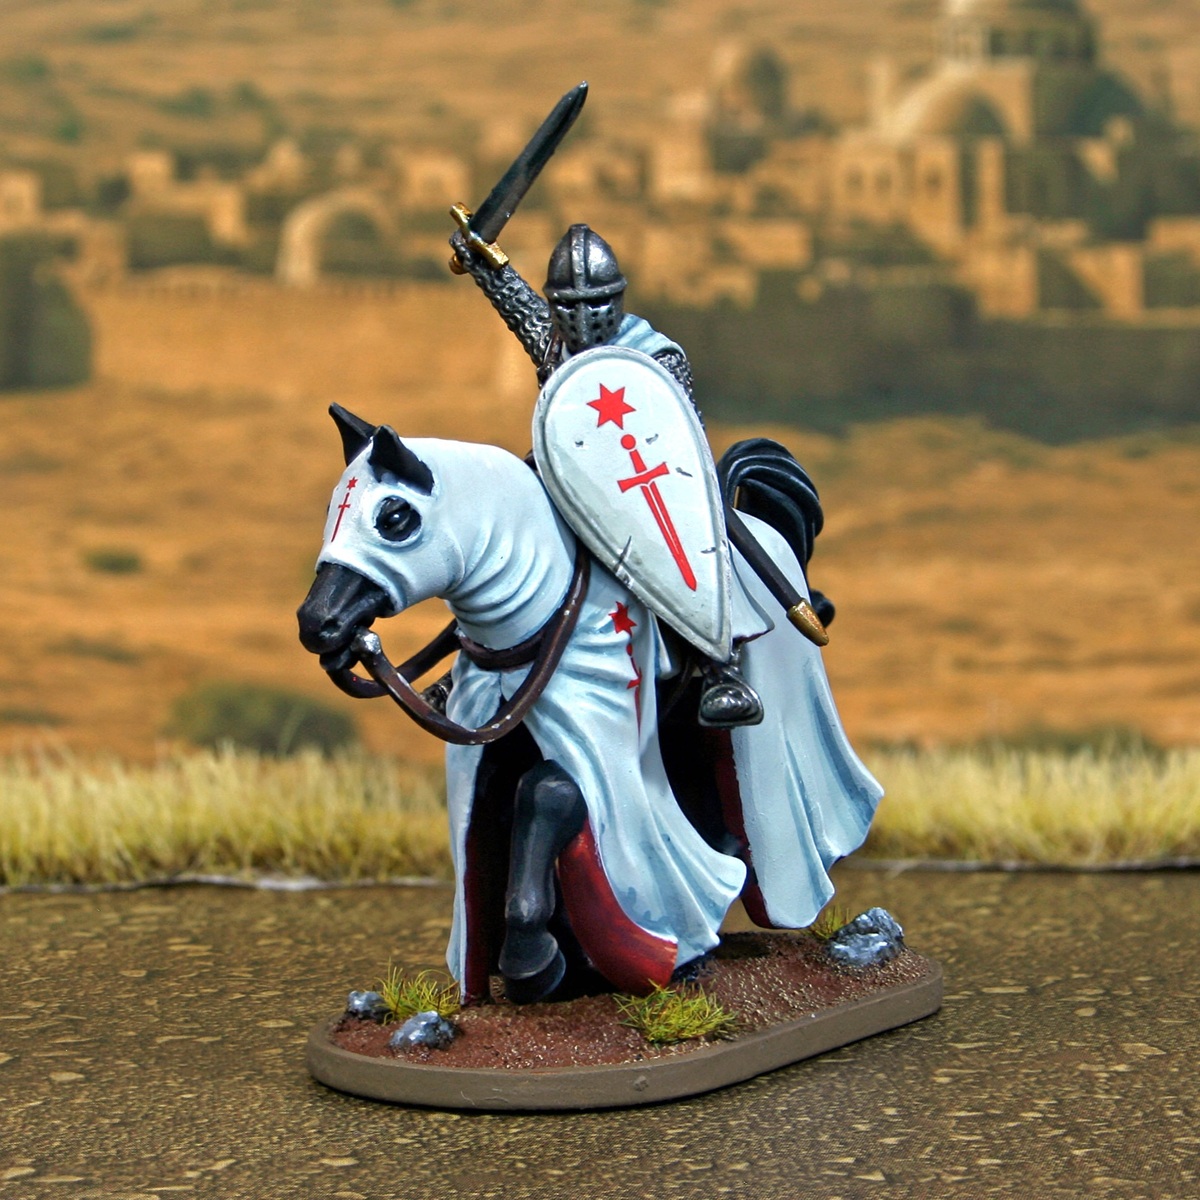

My interpretation of this famous crusader order. The decals come courtesy of the fine people at forgottenchapters.eu and their "Crusader Orders V3" sheet.
 Red Lining
- Basecoat with Khorne Red .
- Apply chunky highlights with Evil Sunz Scarlet .
- Now add finer highlights of Troll Slayer Orange .
- Selectively highlight with Fire Dragon Bright .
.jpg) Black Horse
Black Horse
- Basecoat with Black .
- Glaze very general highlights on all raised details with 1:1 Black and Dryad Bark .
- Add chunky highlights of Dryad Bark , to help define the shape of the skin.
- Mix the Dryad Bark 1:1 with Baneblade Brown and add in fine highlights, within the previous stage.
- Selectively highlight with pure Baneblade Brown .
- Mix some Ushabti Bone into your Baneblade Brown , then finish with some very small highlights.
.jpg) Black Tail
Black Tail
- Basecoat with Black .
- Drybrush with Skavenblight Dinge .
- Selectively pick out upward facing curves with Stormvermin Fur .
- Mix a little Ivory into your Stormvermin Fur and add a few smaller highlights to accentuate the previous steps.
(1).jpg) Hooves
Hooves
- Basecoat with Black .
- Add chunky highlights with Dark Reaper .
- Now fine highlight with Thunderhawk Blue .
- Selectively highlight using Fenrisian Grey .
- Mix a little White into your Fenrisian Grey and add some final very small highlights.
.jpg) Padded Armour
Padded Armour
- Basecoat with 1:1 Karak Stone and White .
- Glaze some shading in with Tallarn Sand .
- Shade selectively with Steel Legion Drab .
- Highlight with the 1:2 Karak Stone and White mix from earlier.
- Highlight selectively with White .
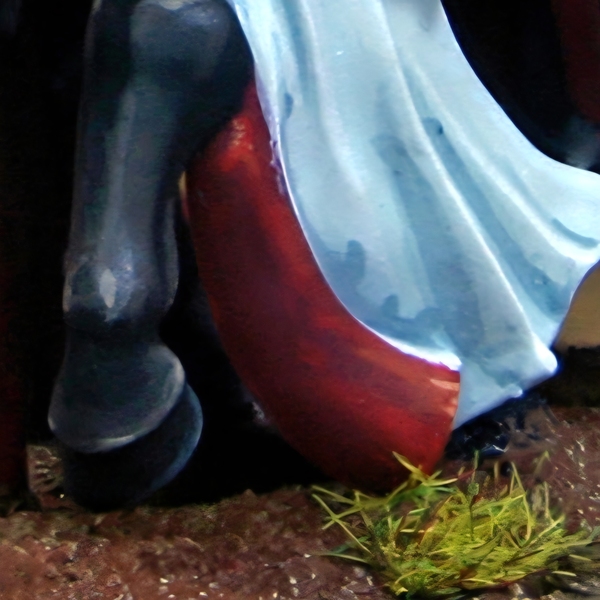
.jpg) White Cloth
White Cloth
- Basecoat with 1:1 Celestra Grey and White .
- Mix your base colour 2:1 with Dark Reaper , then add some general shading to the cloth. Thin with a medium of your choice and be quite generous.
- Increase the amount of Dark Reaper in the above paint so it is now 1:2 base colour and Dark Reaper . Use this colour to more selectively shade the cloth.
- Add extra definition with pure Dark Reaper in exceptionally deep recesses or where the cloth meets other materials.
- Mix the original basecolour 1:1 with White , then highlight.
- Finish with pure White highlights.
.jpg) Dark Brown Leather
Dark Brown Leather
- Basecoat with Rhinox Hide .
- Add edge highlights to everything and volumetric highlights with Doombull Brown .
- Selectively highlight with XV-88 , using the big highlights from the previous stage as a guide.
- Finish with very small Screaming Skull highlights.
Wood
- Basecoat with Thondia Brown .
- Shade with Rhinox Hide .
- Highlight and add woodgrain with a mix of 2:1 Thondia Brown and Steel Legion Drab .
- Take the above paint and mix it 1:1 with Administratum Grey . Now use this for fine highlights.
- Increase the amount of Administratum Grey again, then add selective highlights.
- Finish with a few specular highlights of pure Administratum Grey .
.jpg) Argent (Silver/White) Tincture
Argent (Silver/White) Tincture
- Basecoat with 1:1 Celestra Grey and White .
- Shade with pure Celestra Grey .
- Mix Stormvermin Fur into your Celestra Grey and enhance the shading. Finishsing with pure Stormvermin Fur where needed.
- Mix the original basecolour 1:1 with White , then highlight.
- Finish with pure White highlights.
For the chipping, I added dots and scratches with Dryad Bark , then underline with White .
.jpg) Chainmail and Steel
Chainmail and Steel
- Basecoat with Leadbelcher .
- Wash with Nuln Oil .
- I also like to enhance the shading in recesses and where areas of steel need separating. For this I typically use glazes of Agrax Earthshade .
- Overbrush and highlight using Ironbreaker .
- Finish with selective highlights of Silver RLM01 Metallic .
.jpg) Blade
Blade
- Basecoat with Vallejo Metal Color Silver .
- Glaze shading over half of the blade with Gryph-charger Grey . I would recommend keeping this thin and doing a couple of passes.
- Repeat on the half furthest from the pure silver, creating a rudimental gradient. This time I use Nuln Oil straight from the pot.
- Ensure tall edges are highlighted, where the previous two sets of glazes may have over spilled. For this I like to use Ironbreaker , simply because I find it catches edges easier than Vallejo Metal Color paints.
- Finish with selective highlights of Silver RLM01 Metallic on edges that still have the solid Silver basecoat. Focus more highlights towards the tip.
.jpg) Gold Details
Gold Details
- Basecoat using Retributor Armour .
- Shade selectively with Reikland Fleshshade where there are details or recesses that need more definition.
- Add some Silver RLM01 Metallic to the Retributor Armour , and highlight selectively.
- Finish with a few dots of pure Silver RLM01 Metallic .

Rookie Brushes
RookieBrushes
Aspiring miniature painter and biscuit enthusiast. Here to share my hobby and help where I can.
Citadel Painting System 29
Base 9
- Celestra Grey
- Dryad Bark
- Khorne Red
- Leadbelcher
- Retributor Armour
- Rhinox Hide
- Steel Legion Drab
- Thondia Brown
- XV-88
Shade 3
- Agrax Earthshade
- Nuln Oil
- Reikland Fleshshade
Layer 16
- Administratum Grey
- Baneblade Brown
- Dark Reaper
- Doombull Brown
- Evil Sunz Scarlet
- Fenrisian Grey
- Fire Dragon Bright
- Ironbreaker
- Karak Stone
- Screaming Skull
- Skavenblight Dinge
- Stormvermin Fur
- Tallarn Sand
- Thunderhawk Blue
- Troll Slayer Orange
- Ushabti Bone
Contrast 1
- Gryph-charger Grey
Vallejo Metal Color
Base 1
- 77.724 Silver
Vallejo Model Air
Base 1
- 71.063 Silver RLM01 Metallic
Vallejo Model Color
Base 3
- 70.918 Ivory
- 70.950 Black
- 70.951 White