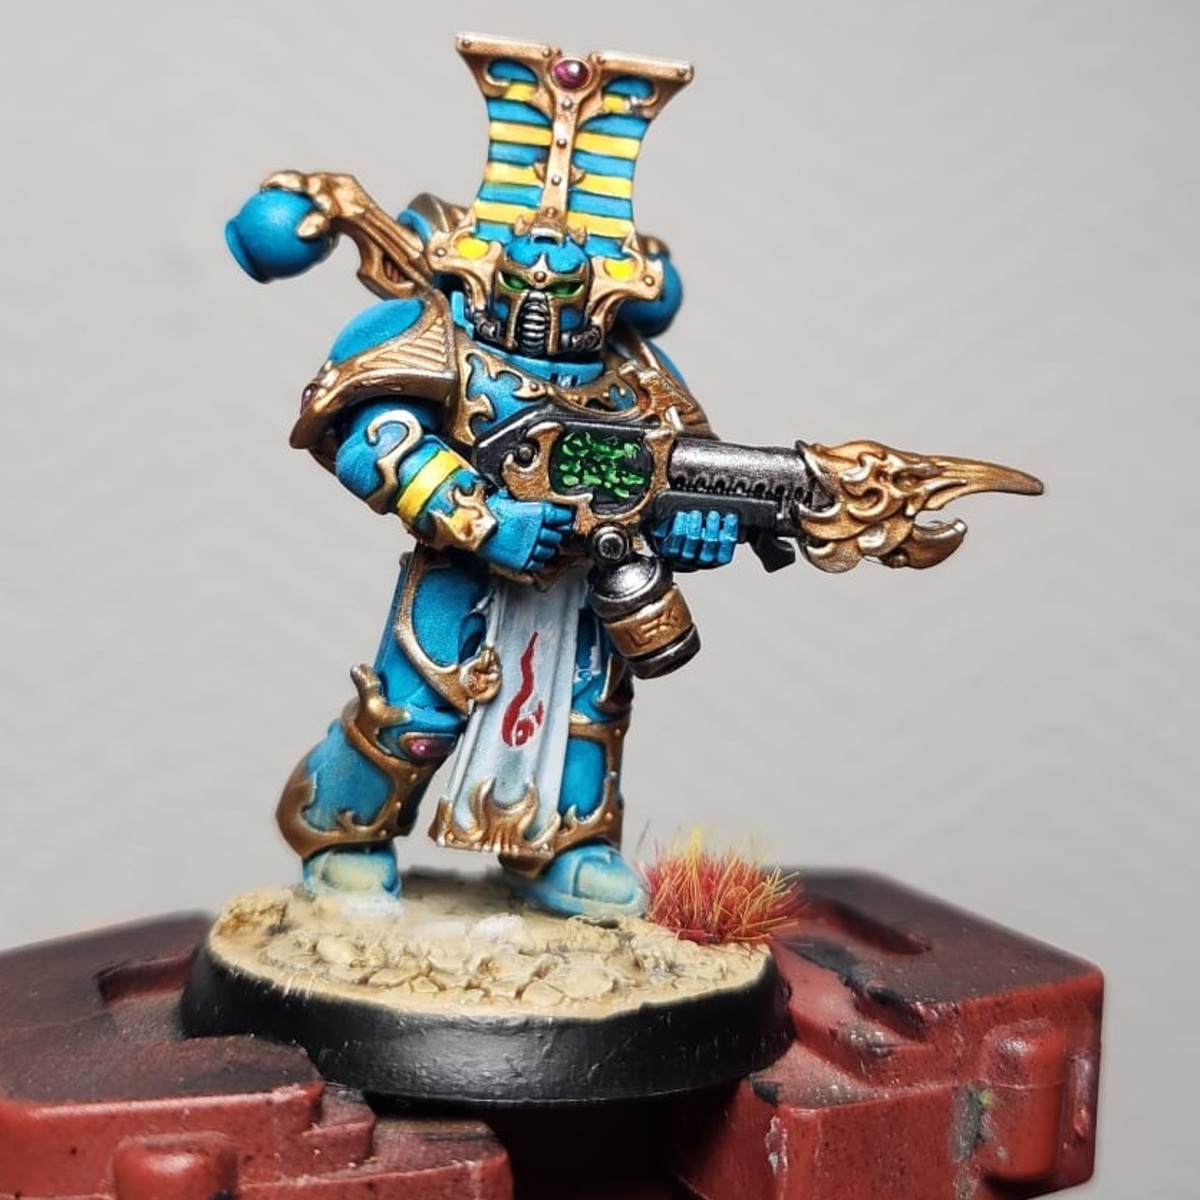
Thousand Sons Armor
Taking parts from Warhipster and 'Eavy Contrast marines.
Blue Ceramite
- Spray the entire miniature in Corax White.
- Go over the blue armor plates with a thin layer of Akhelian Green
- Add in an edge highlight of Temple Guard Blue . Be sure to highlight exposed edges and just inside of what will be the metallic trim if possible. If not, that's fine.
- Do a light drybrush of Temple Guard Blue on the shoulders. Followed by another drybrush of Baharroth Blue . Only on the top parts of the shoulders, to make it seem more shiny. Also drybrush other parts of the armor as you want, I like the light blue effect.
Other Armor
- Tidy up the leather bits between the armor and paint them with Black Templar
- Clean up the parts that need to be yellow, then add Iyanden Yellow
- HIghlight the yellow with Phalanx Yellow , then finish up with a highlight of Moon Dust at the outer edges. Fix any mistakes on the Blue with some Temple Guard Blue or Baharroth Blue depending on location.
Cloaks
- If there are any cloaks, make a 2:1 mix of Volupus Pink and Shyish Purple and carefully paint the cloak, leaving no marks except in the deepest recesses.
- After it dries, paint over it with Volupus Pink to get a nice even coating. Once that dries, either highlight, or drybrush, it with Warlord Purple if you want to clean up any strong mistakes. Finally, edge highlight the strongest edges with Cadian Fleshtone , again if you want. It's quite strong so be careful
- Paint the inside of the cloak with Skeleton Horde . When that dries, go over it with Screaming Skull to clean it up.
Tabard
- After that, use some Fenrisian Grey on the black leather between the armor to give it more definition, if you want.
- Paint the tabard with Gryph-charger Grey , then highlight with Ulthuan Grey and end up with Corax White for the fine edges.
- Use Mephiston Red to paint the mark of Tzeentch on the tabard.
Now for the horrible part, the Golden Rims
- Create a mix of Runelord Brass and Liberator Gold to paint the entire rim of the armor.
- Shade the rim with Guilliman Flesh , removing any access contrast so it doesn't pool.
- Take this time to clean up any mistakes on the blue with Ahriman Blue or Temple Guard Blue depending on if the mistake was in a darker or lighter part.
- Once it's dry, use Canoptek Alloy to do an edge highlight all along the trim.
- Add a dot highlight of Stormhost Silver to points and the centre of areas highlighted in the previous steps.
The Weapon and eyes
- If the weapon is a flamer, use this picture. The black is Black Templar , the betal is Iron Hands Steel , the bird is the same as the gold: Runelord Brass and Liberator Gold
- Shade the metal with Basilicanum Grey , the bird with Guilliman Flesh and paint the runes with Corax White
- For the runes, use a 1:1 mix of Warpstone Glow and Contrast Medium . Do the same for the eyes.
Gems
- Paint the gems with Corax White , then use Volupus Pink on the gems. First layer paint them from bottom left to upper right so a drop stays on the upper right side when drying up.
- Again use Volupus Pink this time on the upper to upper right side of the gem. after applying it, use your clean brush to feather the paint down a bit to make the transition nicer.
- Once it's dry, use Black Templar on the upper right corner and feather it down a bit to give it a more gem-like effect.
- Highlight the gem using a mix of Fulgrim Pink and Warlord Purple
- Now another light edge highlight on the bottom left with a mix of Fulgrim Pink and Corax White followed by a very tiny dot of Corax White at the upper right corner.
Orobouros Mark
- Use Averland Sunset to paint the Orobouros, starting with a circle and rotating the model to make it easier to create a proper circle. do the details and done.
The Base
Note: If you have any terrain pieces like temple bits, work around them. Follow the rest and maybe drybrush with Screaming Skull to have a different look to it.
- Heavily put Martian Ironearth on a black base and let it dry. While drying, add a few tiny bits of Armageddon Dust and some black sand.
- When it's dry, spray it Corax White . Then drybrush with Zandri Dust and highlight with Ushabti Bone
- Shade the whole thing with Seraphim Sepia . Add more or less depending on where you want it to have shades etc.
- Let it dry and use Ushabti Bone again as a heavy drybrush until it brightens up to your liking. If you want, add some Agrax Earthshade now to darken up inside some specific parts. Look at the other bases you've done to compare.
- It will end up quite shiny, so use some Ardcoat (matte) to remove the shinyness.
- Finally, add the red Alien Tufts and drybrush lightly the feet of the models with Ushabti Bone to give it a sand effect.
Citadel Painting System 38
Base 6
- Averland Sunset
- Corax White
- Iron Hands Steel
- Mephiston Red
- Runelord Brass
- Zandri Dust
Shade 2
- Agrax Earthshade
- Seraphim Sepia
Layer 14
- Ahriman Blue
- Baharroth Blue
- Cadian Fleshtone
- Canoptek Alloy
- Fenrisian Grey
- Fulgrim Pink
- Liberator Gold
- Phalanx Yellow
- Runelord Brass
- Screaming Skull
- Stormhost Silver
- Temple Guard Blue
- Ushabti Bone
- Warpstone Glow
Technical 2
- Ardcoat
- Contrast Medium
Texture 2
- Armageddon Dust
- Martian Ironearth
Air 2
- Temple Guard Blue
- Ulthuan Grey
Spray 1
- Corax White
Contrast 9
- Akhelian Green
- Basilicanum Grey
- Black Templar
- Gryph-charger Grey
- Guilliman Flesh
- Iyanden Yellow
- Shyish Purple
- Skeleton Horde
- Volupus Pink
Vallejo Game Color
Base 1
- 72.014 Warlord Purple