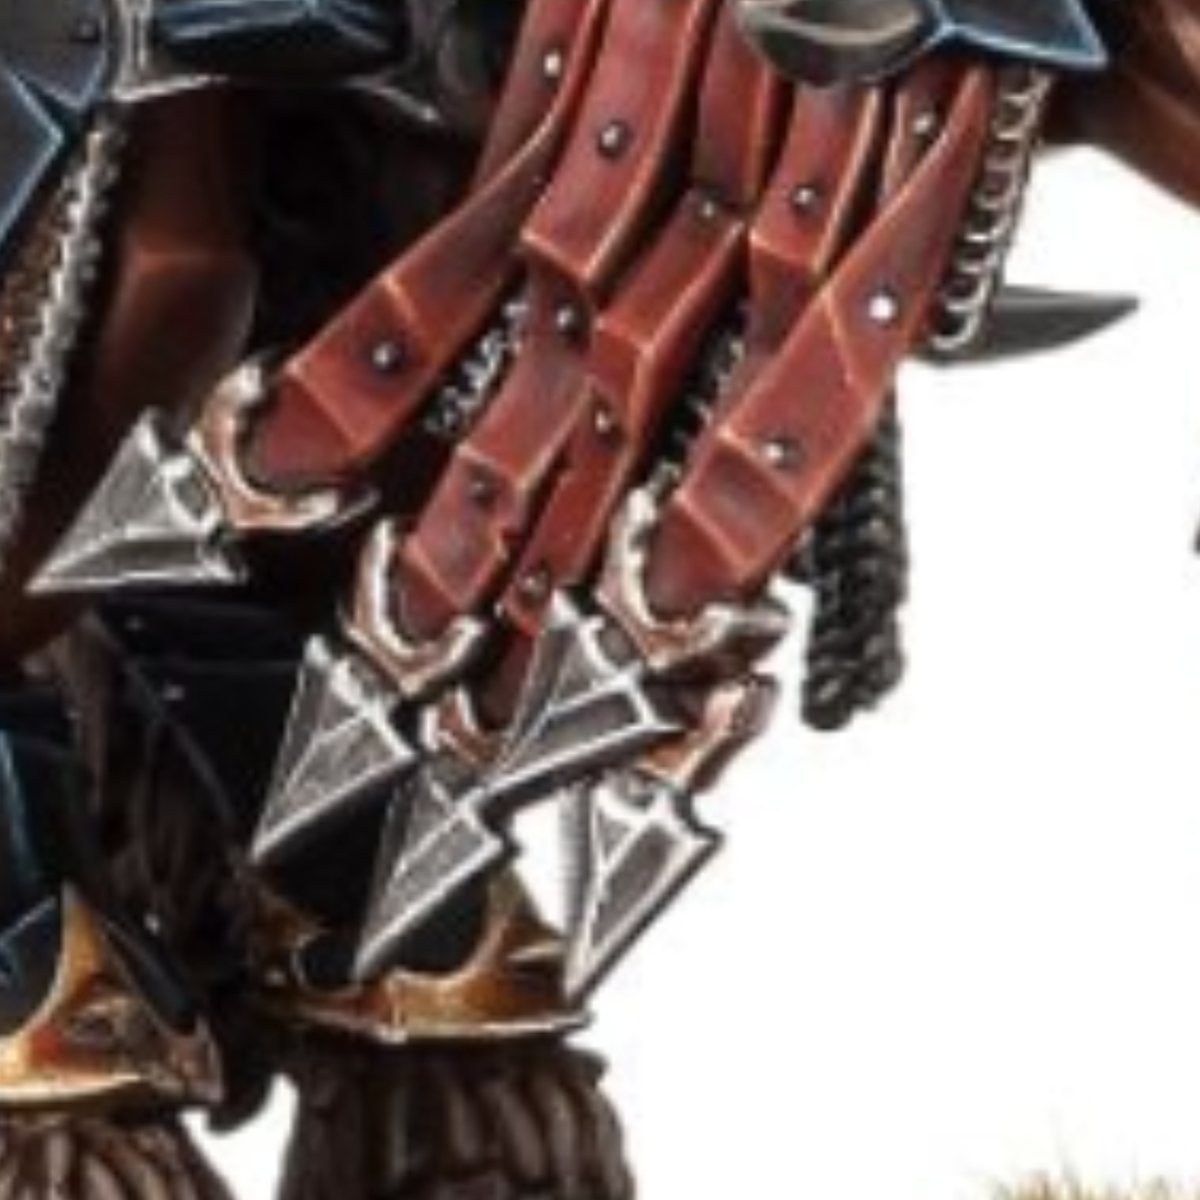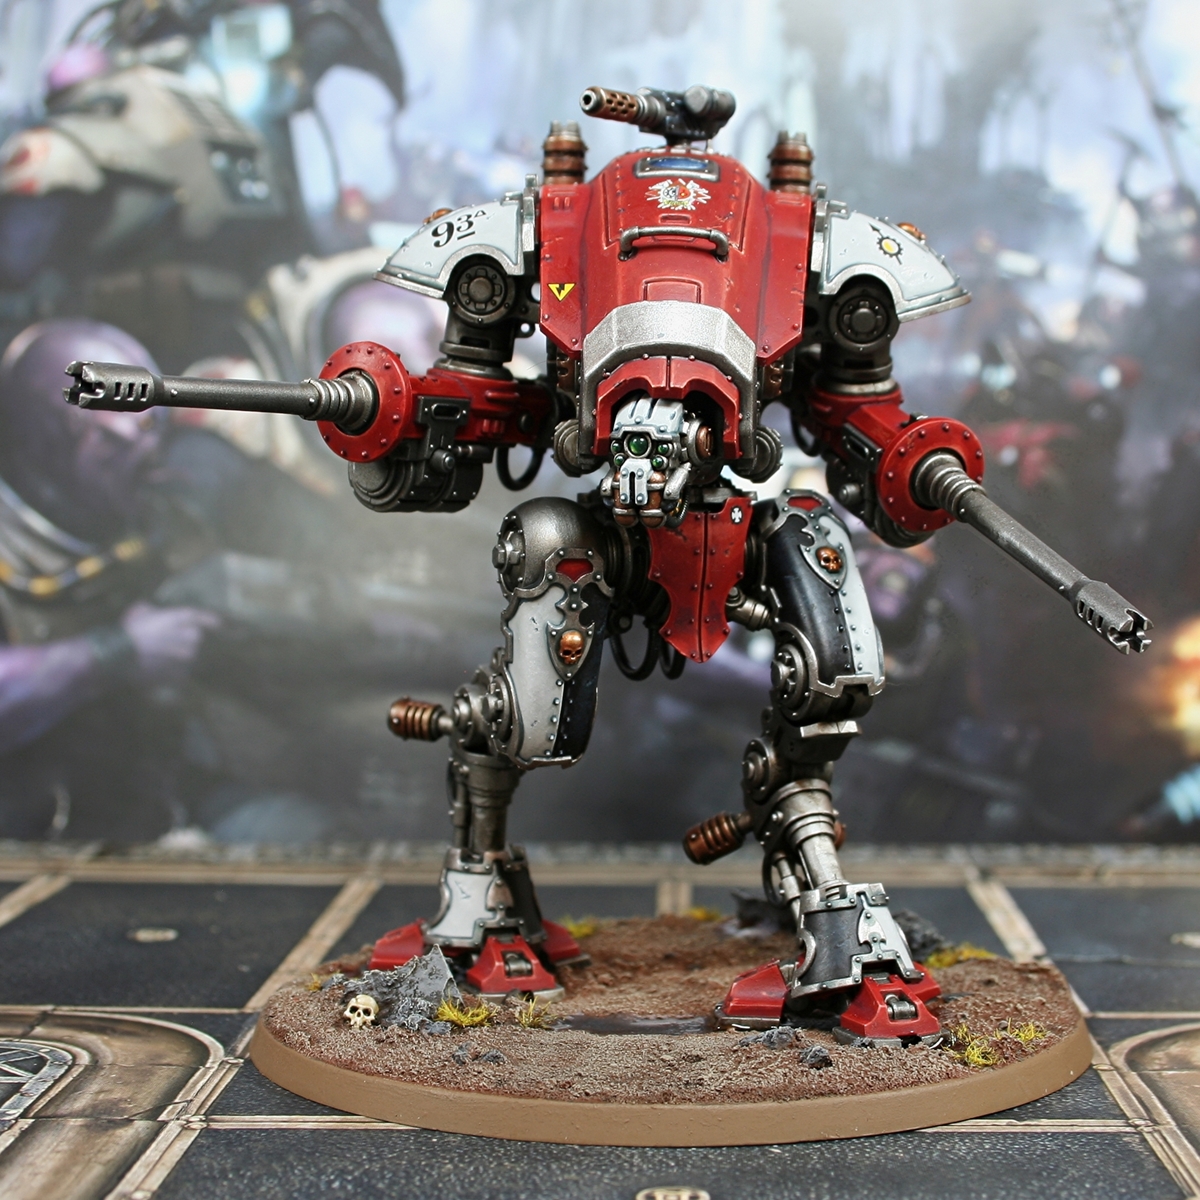
House Taranis Imperial Knight

Here is how I painted my first ever Questor Mechanicus Imperial Knight. I was really drawn to the colour scheme of this one and had to put something together.
Steel Endo Skeleton
- I started by masecoating all of the metal with Vallejo Metal Color Gunmetal Grey .
- Then I highlighted the metal with a zenithal highlight of Duraluminum through my airbrush. You could apply these highlights by hand or with a drybrush, but use an airbrush if you have one.
- Then give the skeleton a quick drybrush with White Aluminum . This didn't make a tonne of difference, but the idea is for it to pick out edges quickly and add some variety in shade. I kept my brushstrokes downwards in direction mostly to enhance the volumes created so far.
- Wash all of the metal. I mixed a a bunch of Winsor and Newton "Winton" oil paints together in some artists' white spirit to get a nice shade. Specifically 3 parts 'Ivory Black', 1 part 'Burnt Sienna' and just a touch of 'Cobalt Violet Hue'. With a makeup sponge, I went over the model while it was stil wet, roughly brushing down with a makeup sponge, wiping the paint away from exposed areas.
- Now leave the oil paints for 24 hours or so and then seal them in. I sed Vallejo satin acrylic varnish for this.
- With the paints underneath protected, you can paint over the metallics with ease and the surface of the mini can take paint well. I edge highlighted ares that would catch light well with some Chrome for a little extra punch.
If you were not interested in using oil paints, you could still use normal washes to shade the metallics. I would recommend an overall wash of a black-ish wash like Nuln Oil , then brushing some browns like Agrax Earthshade or Seraphim Sepia towards recesses. To smooth transitions or make the browns darker, you could even mix the browns and blacks together.
Tubing
- Basecoat with Mechanicus Standard Grey .
- Wash with an equal parts mix of Black Templar and Contrast Medium .
- Overbrush/drybrush exposed areas with Dawnstone .
- Lighting repeat, coverring a smaller area with Administratum Grey .
Brass Casing
- Basecoat with Balthasar Gold .
- Wash with Agrax Earthshade .
- For deep recesses, shade with Wyldwood .
- Mix some Retributor Armour and Stormhost Silver into your Balthasar Gold and add chunky highlights.
- Mix in more Stormhost Silver , so it is roughly 50% of the mix and add fine edge highlights.
- Finallky, add small, selective edge highlights of Stormhost Silver .
Red Armour Plating
- Basecoat with Mephiston Red .
- Thin some Khorne Red to a wash consistency, then use it to shade recesses and relevant areas. Make this shading quite general, as we will be going darker later.
- Mix Khorne Red and Incubi Darkness 1:1 (to roughly the same consistency as above) and paint the recesses with more precision. Use this same mix on all of the previus stages shading too, but cover less area.
- For areas you want extra dark, take some thin Abaddon Black and drop it into recesses.
- Glaze Evil Sunz Scarlet towards exposed areas. Drag your brush towards waht should be the brightest point. Use this colour to establish chunky edge highlights.
- With Wild Rider Red , repeat the step above, but cover less area and doing fine edge highlights.
- Now mix some Ice Yellow into your Wild Rider Red (probably 1:2), then glaze and highlight selectively. Only picking out areas that need the most punch, you don't want to change the overall colour too much at this stage. If you want to be a Citadel purist, feel free to use Dorn Yellow .
- Now add very small highlights of Ice Yellow and Wild Rider Red . These should be very selective highlights.
- Finally, add specular highlights of Ice Yellow to only the most extreme point that would catch light.
I wanted a little something to break up the panels, so I added a small amount of chipping. FOr this I did a few dots, lines and patches with my Khorne Red and Incubi Darkness mix from earlier. I then underlines these marks with dots of Wild Rider Red and occasional small dots with a little Ice Yellow mixed in.
Black Panels
- Basecoat with Abaddon Black .
- Stiple righ higligths in with a thin mix of Abaddon Black and Stegadon Scale Green . I used a small rount makeup brush for this.
- Repeat the above, coverring a smaller area with pure Stegadon Scale Green .
- Wash the panels with Nuln Oil , brushing the wash towards recesses. this is to help blend the two steps above.
- Pick out any edges with a fine line of Thunderhawk Blue and paint any rivets with the dame colour.
- Add tiny dots of Fenrisian Grey to the rivets. Try to hit a smaller area, ideally from the top.
Like my red panels, I added a few marks with Abaddon Black and underlined with dots of Thunderhawk Blue .
White Panels
- Basecoat with Corax White .
- Stiple righ higligths in with a thin mix of Corax White and White Scar . I used a small rount makeup brush for this.
- Repeat the above, coverring a smaller area with pure White Scar .
- Wash the panels with Apothecary White and Contrast Medium , brushing the wash towards recesses. this is to help blend the two steps above.
- Take some Dark Reaper , water it down and carefully shade the recesses , go around rivets too.
- With White Scar , pick out rivets and panel edges.
Like my red panels, I added a few marks with Dark Reaper , then underlined with dots of my Corax White and White Scar mix from earlier.
Silver Trim
- Basecoat with Leadbelcher .
- With a 1:1 mix of Gryph-charger Grey and Contrast Medium , recess shade all details and rivets. Make a second pass on some areas if you need more colour/definition.
- Go over the recesses again with Nuln Oil , if you want them super dark.
- Pick out highlights with Ironbreaker . and edge highlight.
- Selectively edge highlight with Stormhost Silver .
Basing
- Basecoat with Mournfang Brown .
- Drybrush with Karak Stone .
- Wash stones with a thin black, like Abaddon Black .
- Overbrush stones with Dawnstone .
- Lightly drybrush the whole thing with Screaming Skull .

Rookie Brushes
RookieBrushes
Aspiring miniature painter and biscuit enthusiast. Here to share my hobby and help where I can.
Citadel Painting System 32
Base 11
- Abaddon Black
- Balthasar Gold
- Corax White
- Incubi Darkness
- Khorne Red
- Leadbelcher
- Mechanicus Standard Grey
- Mephiston Red
- Mournfang Brown
- Retributor Armour
- Stegadon Scale Green
Shade 3
- Agrax Earthshade
- Nuln Oil
- Seraphim Sepia
Layer 13
- Administratum Grey
- Dark Reaper
- Dawnstone
- Dorn Yellow
- Evil Sunz Scarlet
- Fenrisian Grey
- Ironbreaker
- Karak Stone
- Screaming Skull
- Stormhost Silver
- Thunderhawk Blue
- White Scar
- Wild Rider Red
Technical 1
- Contrast Medium
Contrast 4
- Apothecary White
- Black Templar
- Gryph-charger Grey
- Wyldwood
Vallejo Metal Color
Base 4
- 77.702 Duraluminum
- 77.706 White Aluminum
- 77.707 Chrome
- 77.720 Gunmetal Grey
Vallejo Model Color
Base 1
- 70.858 Ice Yellow