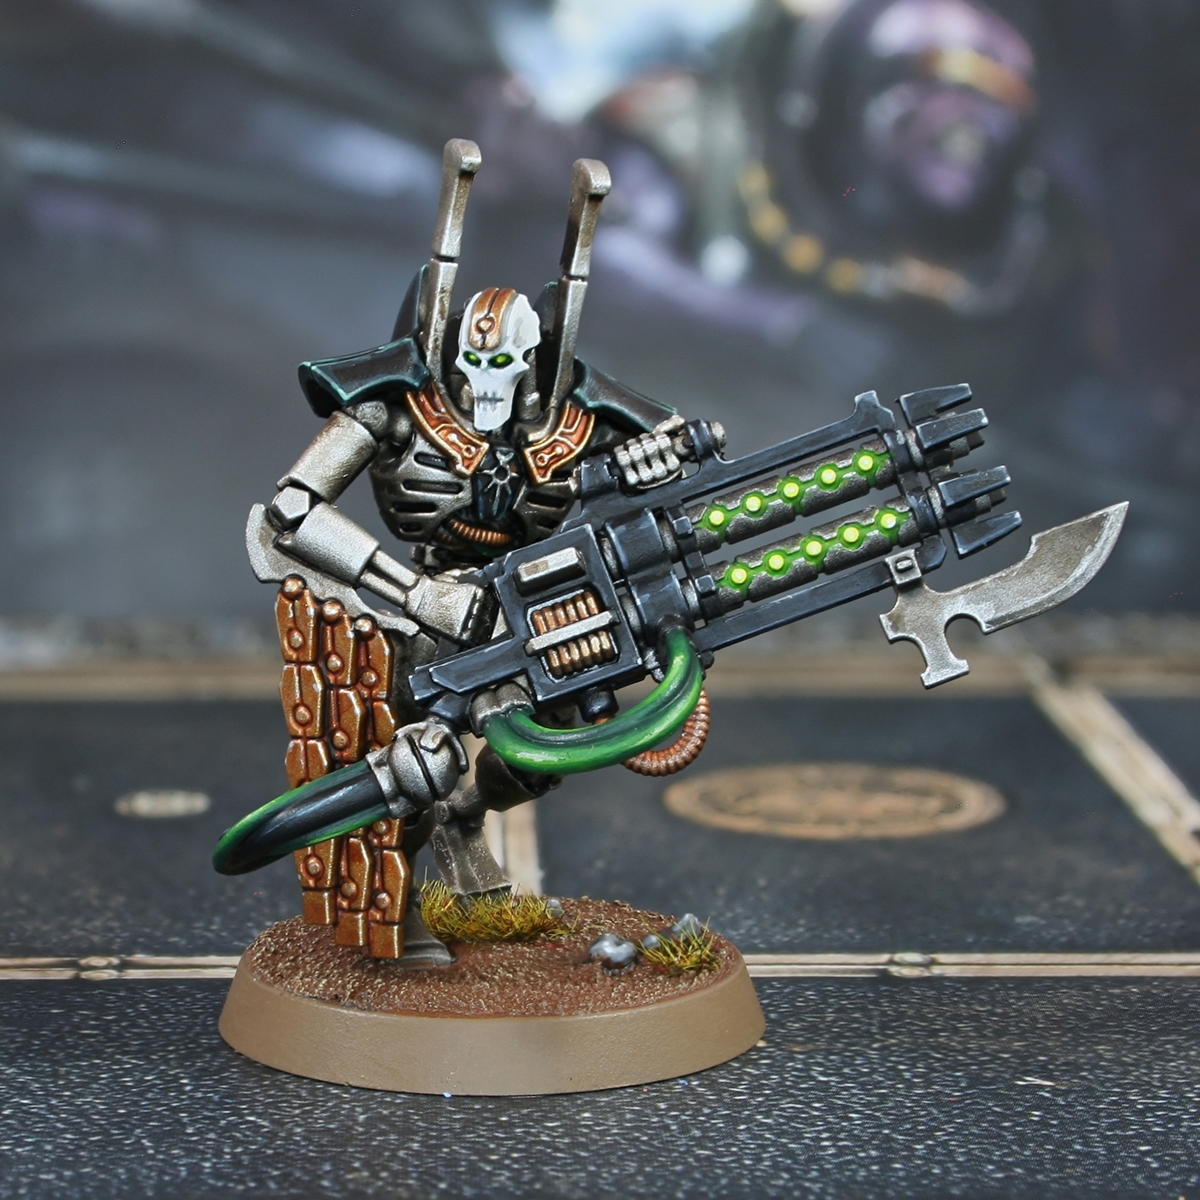
Necron Immortals (Sautekh Dynasty)
Here is how I painted my Necron Immortals. This should cover both of the standard weapon options, but I have included a few extra sections for the Immortal Despotek too.
Living Metal
- Basecoat the model with Gunmetal Grey .
- With an airbrush, spray an all over zenethal highlight of Duraluminum downwards at a 45 degree angle.
- Spray White Aluminum almost straight downward, from the top of the model. Be selective only catching the very top, face and shoulders.
- Now we do an oil wash on all of the Necron and the weapon coil. I poured out the amount odourless Artists' White Spirits I felt I needed for the wash and added paint to it, until I was happy with the consistency. I used 3 parts Ivory Black, with 1.5 parts Burnt Sienna and 1 part Cobalt Violet Hue, all from the Winton range of oil paints.
- After giving the oil paint at least an hour to dry, wipe paint from the exposed areas and avoid recesses. I like to use makeup sponges or those little sponges on stick for applying makeup. If you want to remove the paint extra thoroughly in an area, add a very small amount of white odourless Artists' White Spirits to the sponge.
- Selectively highlight exposed edges and places where the light would hit with Silver RLM01 Metallic
White Armour
- Basecoat with a 1:1 mix of Grey Seer and White .
- Glaze/shade with Grey Seer . Be quite generous with the area you shade.
- Add additional shading with Dawnstone . Make this stage more selective.
- In areas where you want a clear division, shade with very thin lines of Skavenblight Dinge .
- Add edge highlights with White .
Glowing Green Tubes
- Basecoat with Caliban Green .
- Glaze/highlight the majority of the tubes with Warpstone Glow . I'd recommend doing a couple of passes.
- Apply chunky highlights within the previous area with 1:1 Warpstone Glow and Moot Green .
- Now highlight more selectively with Moot Green .
- Cover a small area with 1:1 Moot Green and Ice Yellow . If you prefer, you could use Dorn Yellow .
- Repeat, but with very small highlights of Ice Yellow .
- If you have the space, finish with very small highlights of Ice Yellow and White .
Black Rubber Tubing
- Basecoat with Abaddon Black .
- Paint chunky highlights of Incubi Darkness onto raised details.
- Mix the Incubi Darkness 1:1 with Deepkin Flesh and add fine highlights onto edges.
- Add selective highlights of Deepkin Flesh on corners and points that would catch the light.
- Mix a little Ivory or Pallid Wych Flesh into your Deepkin Flesh and add specular highlights where needed.
Black Weapon Casing
- Basecoat with Black .
- Add chunky highlights of Dark Reaper .
- Fine highlights withal mix of Dark Reaper and Administratum Grey .
- Selectively highlight with Administratum Grey .
Glowing Recesses
- One everything around the area has been painted, run a thin 1:1 mix of Waaagh! Flesh and Moot Green into all of the recesses. Try to get this paint onthe walls of the recess and let the migment rin into the deep part.
- With some very thin, pure Moot Green , take a thin brush and try to hit only the deepest parts of the detail. Try dragging your brush towards the centre or wherever the source of the glow would be.
- Mix some Ice Yellow into your Moot Green and cover an even smaller area.
- Finish with very small highlights of Ice Yellow (and maybe even White after). To show the source of the light.
Dark Metal Barrel
- Basecoat with a 1:1 mix of Leadbelcher and Abaddon Black .
- Flood the recesses with a 1:1 mix of Waaagh! Flesh and Moot Green .
Paint the glowing orbs with White .
- Now wash them with Tesseract Glow . highlight.
- Finish the orbs with a White specular highlight in the centre.
- Finish this detail by edge highlighting the metallic area with Silver RLM01 Metallic .
This is it for the standard Immortals, but there are a few extra bits on the Immortal Despotek....
Black Armour
- Basecoat with Black .
- Chunky highlights of Incubi Darkness .
- Fine edge highlights of Sons of Horus Green .
- Selective highlights of 1:1 Sons of Horus Green and Sybarite Green .
- Add some White to the previous mix, and add specular highlights.
Gold Details
- Basecoat with 1:1 Retributor Armour and Balthasar Gold .
- Shade with Gore-grunta Fur . I like to work it on my wet palette then selectively shade recesses, rather than wash the whole thing.
- Add deep shading to recesses with a thin mix of Doombull Brown and Abaddon Black .
- Add some Silver to what remains of your base mix, then highlight.
- Finally, highlight more selectively with pure Silver .
- While I had the Gore-grunta Fur out, I also washed the ridged tubing with it at this stage.

Rookie Brushes
RookieBrushes
Aspiring miniature painter and biscuit enthusiast. Here to share my hobby and help where I can.
Citadel Painting System 22
Base 8
- Abaddon Black
- Balthasar Gold
- Caliban Green
- Grey Seer
- Incubi Darkness
- Leadbelcher
- Retributor Armour
- Waaagh! Flesh
Layer 12
- Administratum Grey
- Dark Reaper
- Dawnstone
- Deepkin Flesh
- Doombull Brown
- Dorn Yellow
- Moot Green
- Pallid Wych Flesh
- Skavenblight Dinge
- Sons of Horus Green
- Sybarite Green
- Warpstone Glow
Technical 1
- Tesseract Glow
Contrast 1
- Gore-grunta Fur
Vallejo Metal Color
Base 3
- 77.702 Duraluminum
- 77.706 White Aluminum
- 77.720 Gunmetal Grey
Vallejo Model Air
Base 1
- 71.063 Silver RLM01 Metallic
Vallejo Model Color 5
Base 4
- 70.858 Ice Yellow
- 70.918 Ivory
- 70.950 Black
- 70.951 White
Metallic 1
- 70.997 Silver
