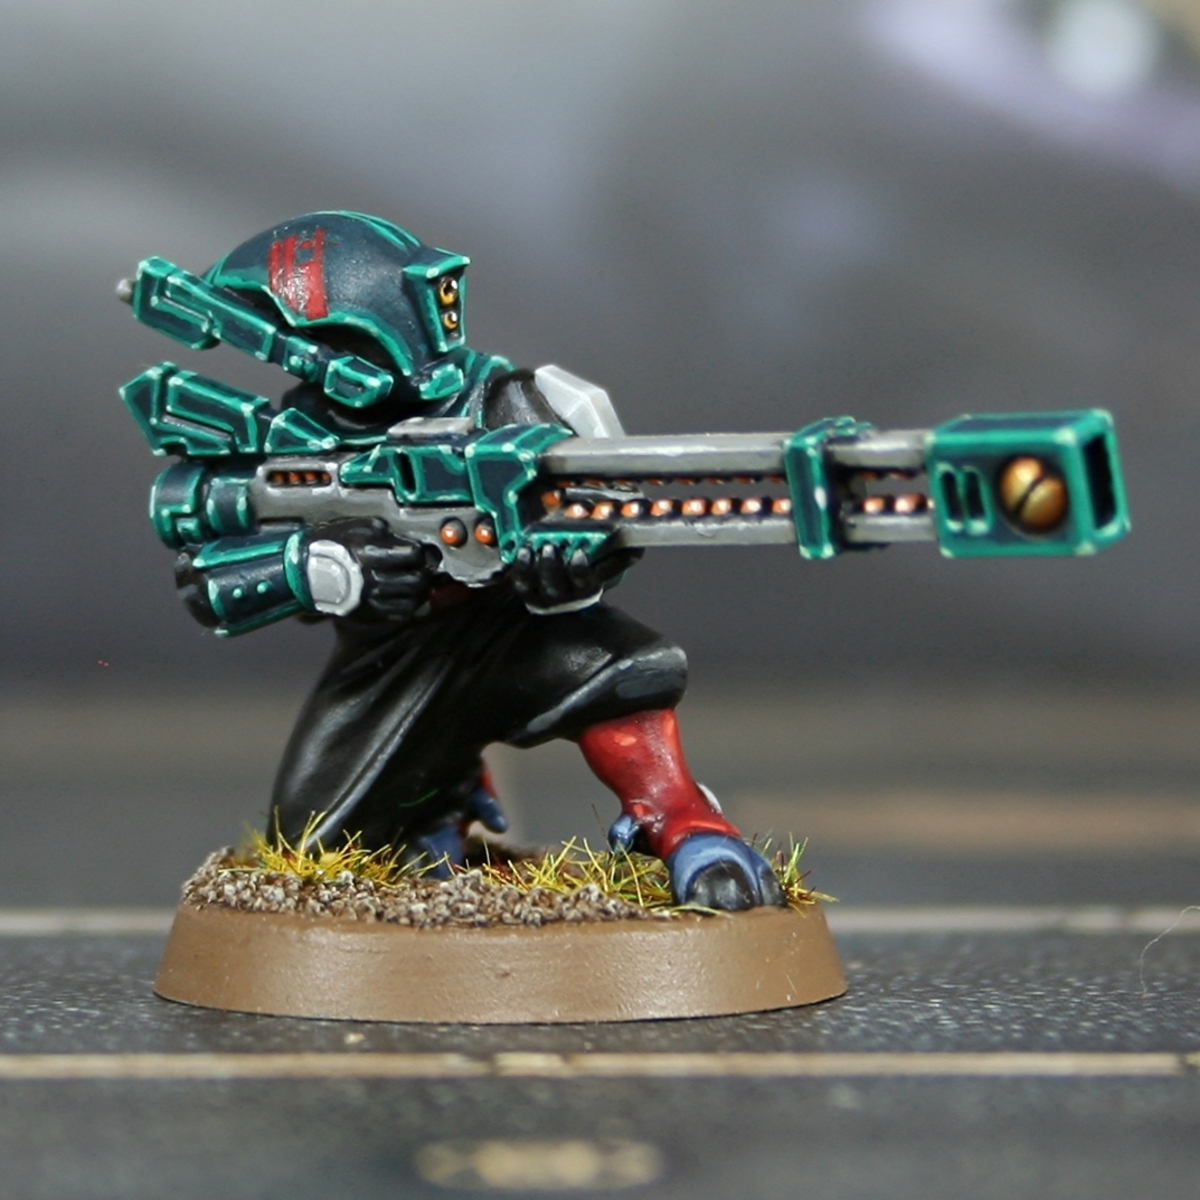
T'au: Stealth/Urban
This is how I paint a stealth oriented T'au Cadre. The scheme is based on desaturated grey-blues, greys, black, red wine (for some pop), bronze and night vision optics.
The recipe calls for wet blending, glazing, dry brushing and edge highlighting. Feel free to omit these techniques or replace them with one you are more comfortable with
The models are based in an environment resembling the setting of 'Spec ops: The Line', wherein a metropolis is in the process of being buried by sandstorms. These sandstorms are creating an artificial night and creating pockets of poor visibility in the urban centre. With that in mind, where reasonable, I've sculpted (poorly) some camouflage cloaks to protect the units from the sandstorm and provide extra concealment. I've tried my best to make the models look battle-worn and battered, hoping to illustrate the desperation of the situation.
The narrative I had in mind is based on this cadre's fire caste and air caste compliment using ambushes, surgical strikes, assassination, and other cunning tricks to delay an attacking force while the T'au evacuate civilians on a T'au assimilated Imperial world, now fully absorbed into the T'au Sphere, with T'au architecture and technology. The T'au are using an otherwise hostile environment to their advantage, using the sun blocking sandstorms as cover in their Kauyon doctrine to disrupt the enemy formations in a painful defence in depth.
Preparation
- Decide if you want to paint the model/s with sub assemblies and separate the parts as you see fit
- Sculpt the cloaks and hoods onto the models now, being mindful of your painting in the future
- Prime the models with Black
- With and airbrush or dry brush; zenithal highlight the models with German Grey from a 45 degree angle. With this and the next step: be sure to keep in mind where you want to have OSL effects and highlight now to sketch it out for later
- With an airbrush or dry brush; zenithal highlight the models with your choice of white ink or Ghost Grey if you use a dry brush
Armour primary & Weapon secondary colour: Grey-Blue
- Mix Luftwaffe Uniform WWII Heavy Charcoal and Dark Blue Grey in a 3-2-1 ratio in that order on your wet palette. This mix is now known as 'Stealth Blue' for the rest of the recipe
- Add Intermediate Blue and Black Grey to the palette
- Wet blend Stealth Blue and Intermediate Blue to create transitions between the Intermediate Blue highlight and Stealth Blue base colour. I recommend you go larger on the Intermediate Blue highlight so that you can smooth your transition with a glaze of Stealth Blue
- Wet Blend Stealth Blue and Black Grey to create your shadows/low-lights. Like with the previous step I recommend having a larger portion of the lighter colour (Stealth Blue this time) to then glaze back and smooth the transition with the darker colour Black Grey
- Edge highlight the armour with Intermediate Blue , with the intense spots being edge highlighted with a 2:1 mix of Intermediate Blue and Ghost Grey
- Edge highlight shadows with Dark Sea Blue
- In the deep recesses and joins of the armour, carefully run your choice of Nuln Oil or Dark Grey any black wash or ink will do.
Weapon primary & Wargear secondary colour
- This portion can be replaced with "Hardware/Frame/Secondary colour below" If you prefer
- Apply Neutral Grey as base coat
- Mix White with Neutral Grey 1:2 and apply highlights
- Glaze shadows with Black Grey
- Edge highlight with White with Neutral Grey 1:1
- Run Nuln Oil or Black Wash into any recesses or relevant joins
Hardware/Frame/Secondary
- This is for any extra weapon bits that won't be Stealth Blue, Warm grey or metallic and any bits of hardware that won't be the Sept or wine coloured embellishment, and general chasis, frame and vents of the model. Paint these parts entirely in Heavy Charcoal
- Now glaze in your shadows and lowlights with Black
- Wash these Heavy Charcoal and Black parts entirely, using either Nuln Oil or Dark Grey
- Edge highlight where appropriate with Heavy Charcoal . If you want a stronger highlight, make a 2:1 mixture of Heavy Charcoal and Mechanicus Standard Grey
Fatigues
- Base coat the fatigues in Black Grey
- Wash the fatigues in Agrax Earthshade
- Re-layer the Fatigues with Black Grey , leaving the recesses untouched with the Agrax Earthshade
- Highlight and edge highlight with Eshin Grey
- Thinly glaze the parts of the fatigues close to the ground with Zamesi Desert or Tallarn Sand (your choice) to simulate dust and sand getting caught in the fabric.
Sept Colours
- This is a home brewed sept. Because I wanted the cadre to be more of a clandestine affair, I thought the sept colour should compliment it. This cool toned grey fit narratively and the scheme. Half light, half dark, I don't know.
Anyway, mix 1:1 Light Grey and London Grey on your wet palette. This colour is now known as 'Sept Colour' - Wet blend the discrete parts we are wanting the Sept Colour, with Sept Colour and Light Grey , keeping light grey more prominent so we can glaze it down with Sept Colour.
- In the low lights and shadows, wet blend Sept Colour and London Grey , same technique as above re: glazing.
- In the absolute shadows, we return to our friend Black Grey to glaze in the shadows from the London Grey lowlights
- Edge highlight 2:1 with Light Grey and Ghost Grey sparingly
- Run Nuln Oil or Dark Grey in the recesses
- With Sept Colour, paint unit markings with on helmets, sinistral pauldrons and leg armour, layering different shades from previous steps depending on their light exposure
Bronze
- Base coat the areas (gyros, etc) you want bronze with Sycorax Bronze
- Wash these areas with Seraphim Sepia or Sepia Wash , just any kind of sepia wash or ink you have
- Re-layer these areas with Sycorax Bronze , leaving the recesses as they are with the sepia wash
- With your choice of matt medium or thinner; Lahmian Medium , Matt Medium , Glaze Medium .
Mix 2:1 Nuln Oil and Medium/Thinner in a dry palette - Glaze the diluted wash onto the shadow side of these metallic parts. Ending the brush stroke in the most shadowed part. Repeat until satisfied
- Edge highlight the bronze with a steel colour. I use Runefang Steel , but use what you have at hand. I ask that you differentiate between steel and silver for the best effect. Steel has a bluer tone with less lustre than silver.
Hardware Tertiary & Embellishments
- Get Burnt Red , Cavalry Brown , Black Red on your wet palette
- Wet blend the Burnt Red and Cavalry Brown on remaining hardware and embellishments. Cavalry brown being your highlight here, you know the drill, glaze down with Burnt Red .
- Wet blend Burnt Red and Black Red , Burnt Red being the lightest colour here. Glaze Black Red to ease the transition.
- Mix Black Red and Black Grey 1:1, glaze this onto the darkest parts of the embellishments to create shadow
- Edge highlight with 3:1 Cavalry Brown + Troll Slayer Orange
- Run Nuln Oil , Black Wash or your choice of black wash into any recesses
Lenses
- Base coat the lenses in Glossy Black
- Glaze Castellan Green from the bottom of the top quarter towards the bottom (top is relevant to where is receiving the most light). Repeat from lower and lower until satisfied.
- From half way down the lense, glaze Deathworld Forest to the bottom, repeat from lower and lower until satisfied.
- From 3/4 down the lense, glaze Elysian Green towards the bottom, glaze from lower and lower until satisfied.
- Take Elysian Green and edge highlight the lenses from the Deathworld Forest parts down
- With White place two small dots at the top of the lenses in the black parts. With the same colour, do a small, thin edge highlight of the top of the black parts of the lenses.
Basing
- Add thin cork layer to act as a footpath, tesselate hexagons in the centre after separating form the street, seal with superglue thin
- Coat with Vallejo Asphalt earth texture
- Add your bits to the scene, careful to not get in the way of the model
- Add Vallejo sand texture paste around the bits and in recesses on the base. Be consistent with the flow of wind.
- Paint the footpath with Dawnstone
- Paint the sand texture with Pale Sand
- Paint the asphalt with streaks of Pale Sand , leading on from the larger clumps of texture to suggest the pile being blown away by wind.
- Wash everything with Seraphim Sepia
- Drybush with Pale Sand
- Add Pigments Desert Dust and Light Yellow Ochre 2:1
- Set with Pigment Fixer
Finishing
- Heavy Charcoal on Base rims
Optional
- Everything below this step is considered optional and not required, but should be completed before the Finishing steps
Cloaks
- Stealth Grey, London Grey , Heavy Charcoal , Titan Dark Blue and then Stealth grey again
Invisibility Field
- Basecoat cloaked area in Administratum Grey
- Thick glaze random areas with Pale Sand prioritise lower areas closer to the base
- Thin wash with Seraphim Sepia
- Base coat cloak line with Dark Sea Blue in an organic line
- Sketch in thin triangles within base coat with Caledor Sky
- Trace thin lines within previous step of Lothern Blue
- Trace thin lines within previous step of Baharroth Blue
- Dots of White on corners of some triangles
- Thin White line on uncloaked side of cloak effect
Weapon Effects
Weathering
OSL
Citadel Painting System 19
Base 4
- Caledor Sky
- Castellan Green
- Deathworld Forest
- Mechanicus Standard Grey
Shade 3
- Agrax Earthshade
- Nuln Oil
- Seraphim Sepia
Layer 11
- Administratum Grey
- Baharroth Blue
- Dawnstone
- Elysian Green
- Eshin Grey
- Lothern Blue
- Runefang Steel
- Sycorax Bronze
- Tallarn Sand
- Troll Slayer Orange
- Zamesi Desert
Technical 1
- Lahmian Medium
Vallejo Auxiliaries
Base 2
- 70.540 Matt Medium
- 70.596 Glaze Medium
Vallejo Game Color 5
Base 2
- 72.046 Ghost Grey
- 72.051 Black
Extra opaque 1
- 72.155 Heavy Charcoal
Wash 2
- 72.200 Sepia Wash
- 72.201 Black Wash
Vallejo Mecha Color
Base 1
- 69.022 Titan Dark Blue
Vallejo Model Color
Base 15
- 70.814 Burnt Red
- 70.816 Luftwaffe Uniform WWII
- 70.836 London Grey
- 70.837 Pale Sand
- 70.859 Black Red
- 70.861 Glossy Black
- 70.862 Black Grey
- 70.867 Dark Blue Grey
- 70.898 Dark Sea Blue
- 70.903 Intermediate Blue
- 70.951 White
- 70.982 Cavalry Brown
- 70.990 Light Grey
- 70.992 Neutral Grey
- 70.995 German Grey
Vallejo Model Wash
Base 1
- 76.517 Dark Grey
Vallejo Surface Primer
Base 1
- 70.602 Black